Table of Content
Make sure you know who will be using your soap as some people may be more sensitive or even allergic to certain herbs. Each soap batch should use about a ¼ cup of dried herbs. Knowing the potential negative impact of all of these ingredients commonly used in traditional soap, why wouldn’t you make the switch to all-natural soaps? All-natural soaps should not contain parabens, SLS, SLES, or triclosan. Make your own all-natural soap and then you really have control over which non-toxic ingredients are used.
Yes, technically you can mix your oils and lye solution together by hand but it takes forevvvvvver to adequately emulsify. It can take more than an hour of constant stirring by hand for some soap recipes to come to trace, compared to 5 minutes or less with a stick blender. Goat's milk soap is one of the most popular homemade soap recipes and it's easy to see why. Goat's milk makes a lovely, creamy, soap that is rich in moisturizing caseins, vitamins, and ingredients that balance the skin's pH and promote exfoliation.
Add Color to the Soap
Making soap for the first time can be quite confusing, so that’s totally normal. However, if it is your first time making soap, then I strongly recommend to just follow the recipe exactly how it’s written. Trying to substitute and redesign soaps so they have different qualities is not something I recommend for a beginner. This recipe should produce a lovely soap, so don’t worry about it too much. Once you actually start making soap, you’ll soon build to skills to be able to use a lye calculator and substitute ingredients happily. The recipe below is a good old-fashioned homemade soap that makes a great base for any fragrance, colorants, and exfoliates that you may wish to add.
This is the beginning of the saponification process or the chemical reaction that turns your mixture into soap. This cold process soap recipe is gentle enough to use on your face thanks to the aloe gel and nourishing oils. Find a juicy aloe plant so you can extract fresh aloe for the soap. When you prepare the extracted aloe in a blender or food processor to make soap, it'll become fluffy like egg whites.
Can You Substitute Oils in Cold Process Soap?
Set the soap on top of parchment paper on a flat surface or a drying rack for two weeks to allow the saponification process to complete and the soap to fully dry. Turn the soap over after two weeks to let it dry on the other side. If the soap did not set at all, or has white or clear pockets in it, this means it is caustic and cannot be used. This is caused by under-stirring during the soap-making process. If you're using a shoebox as a mold, put the lid on it and cover with several towels.

Static cling can cause lye flakes to fly up and stick to your gloves or shirt sleeves. If this happens, remove the flakes immediately. I’m also glad you’ve mentioned that shortening more often than not has palm oil in it. The best way to line your mold when using the freezer/butcher paper is to cut two strips, one to go across the width of your box and the other going across the length. Leave enough on the paper to fold over the edges and secure with tape.
Use a double boiler to make soap
Ashley L. ContiSince Twombly likes her bars of soaps to be exact, she uses a muffin tin to measure out the 5-ounce bars, pouring the mixture in individual muffin cups. After the soap has set for about 24 hours, it should be hard enough to unmold and slice. Slice it into the size bars you like and set it aside to cure. The soap is technically safe to use, but it is best tocure it for about four weeks before use.

Please allow additional time if international delivery is subject to customs processing. Delivery times may vary, especially during peak periods. It is important to note that when making soap, the ingredients must be measured by weight, not volume, so a scale is necessary for the process. Set the soap in a safe place and leave it alone. It takes about 24 hours for the soap to harden enough to take it out of the mold and slice it. The color is a variation where soap-making becomes art and where you can create your custom soap masterpieces.
This printable cheat sheet walks you through the entire soap making process, from start to finish. It also includes a checklist to ensure you never forget a lye safety step, so you can soap safely. Too much lye in the recipe, which is the most worrisome of the bunch because it leaves lye in your finished soap bar.
The soap you make won't kill germs, but it will certainly wash them away as well as any other bar soap you might buy. Keep in mind, too, that DIY soap tends to have a lighter scent than traditional, store-bought soap. You can use more essential oil for a stronger smell, but this can be costly, especially if you use more expensive oils.
With the introduction of stick blenders to soap making, the trace can be reached in a few minutes. And now is usually the time to add any extras like flowers, fragrance, essential oils, colors or textures into your recipe. There are so many things that you can add, check out some of theseinteresting soap making ingredients and textures. My very first batch of DIY milk soap was, objectively, ugly.

"It is the process of making soap as someone who is about to start my own soap-making business." This is the reaction where a triglyceride undergoes a nucleophilic substitution reaction with a hydroxide to create three soap molecules and a glycerol. Let the soap sit, exposed to air for at least one month.
Lots of things can be used as exfoliators in soap. My favourite is poppy seeds, although you can use anything that’s coarse and doesn’t dissolve in liquid soap batter. Using a stick blender begin carefully stirring your mixture for several minutes, slowly at first without switching the blender on. After you’ve added about half the lye granules, check the temperature of the lye/milk mixture. You want the lye/milk mixture to come up to above 85 degrees Fahrenheit but stay below 100 degrees. Higher than 100 degrees and your milk will scald and curdle; lower than 85 degrees and the lye granules may not dissolve fully.
Glass, wood, ceramic or cardboard all lined with freezer/butcher paper will also make suitable molds. Avoid using any metal molds unless you can be sure they are stainless steel. If you don't have a specific soap mold, then any good size container will do. Sturdy plastic containers that still have enough give to ease the soap out make the best containers because you don't have to line them. Don’t be tempted to use your soap until you are sure that it has cured, if in doubt test it with a ph strip to make sure it is somewhere between 7-10. If you made a mistake and after 4 weeks it measures above 10 don’t just throw it away as you can rebatch it.
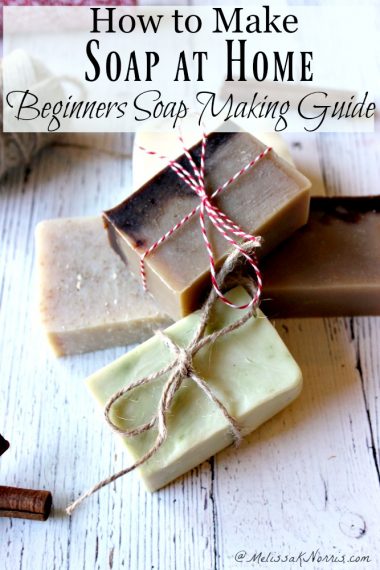
Homemade Soap Recipes From Scratch
Some people can even develop an allergic reaction to lye, while others develop just an annoying itch. So if you are making your own soap and your skin itches then the most likely culprit is the lye, and that you probably added too much lye to the soap. Lye is also some kind of binding agent between the water, fats, and the different oils you might use for your soap. The problem is that if you do not add lye to your soap then the ingredients will not mix.


No comments:
Post a Comment